![]()
If you’re into microservices, you’ll eventually have to deal with message brokers. Getting ready for this switch will definitely boost your confidence and make you feel more prepared.
What are message brokers?
Let’s start with simple, what even is a message broker? I’ll try to make it easy to understand at this point. Let’s take a party for example. Every person wants to share some story, but instead of everyone shouting over each other, we will have one designated storyteller. This person listens to all the stories and shares them one at a time with the entire group. This person is our message broker at this moment, ensuring that all stories reach the group without chaos.
That’s exactly how message brokers work, of course, there are more details into it, but it’s their general concept.
Message broker components
- Publisher/Producer - part of your project that sends message to a Topic. In Publish/subscribe method (discussed below) they are generally called Publishers.
- Consumer/Subscriber - part of your or maybe separate project that consumes messages sent by Publisher via subscribing to a certain Topic.
- Topic - storage for all of your messages sent by Publishers.
Message broker models
Since we’ve just mentioned details, let’s dive into some of them. Message brokers offer two message distribution patterns, which are:
- Point to point messaging
- Publish/subscribe messaging
Let’s dig into each of them.
Point to point messaging

With Point to point messaging each message in the queue is sent only to one recipient and is consumed only once. This distribution pattern is usually used in systems which require one-to-one relationship, example of which could be financial transaction processing. In such cases, both, senders and recipients need a guarantee, that each payment will be sent once only.
Publish/subscribe messaging
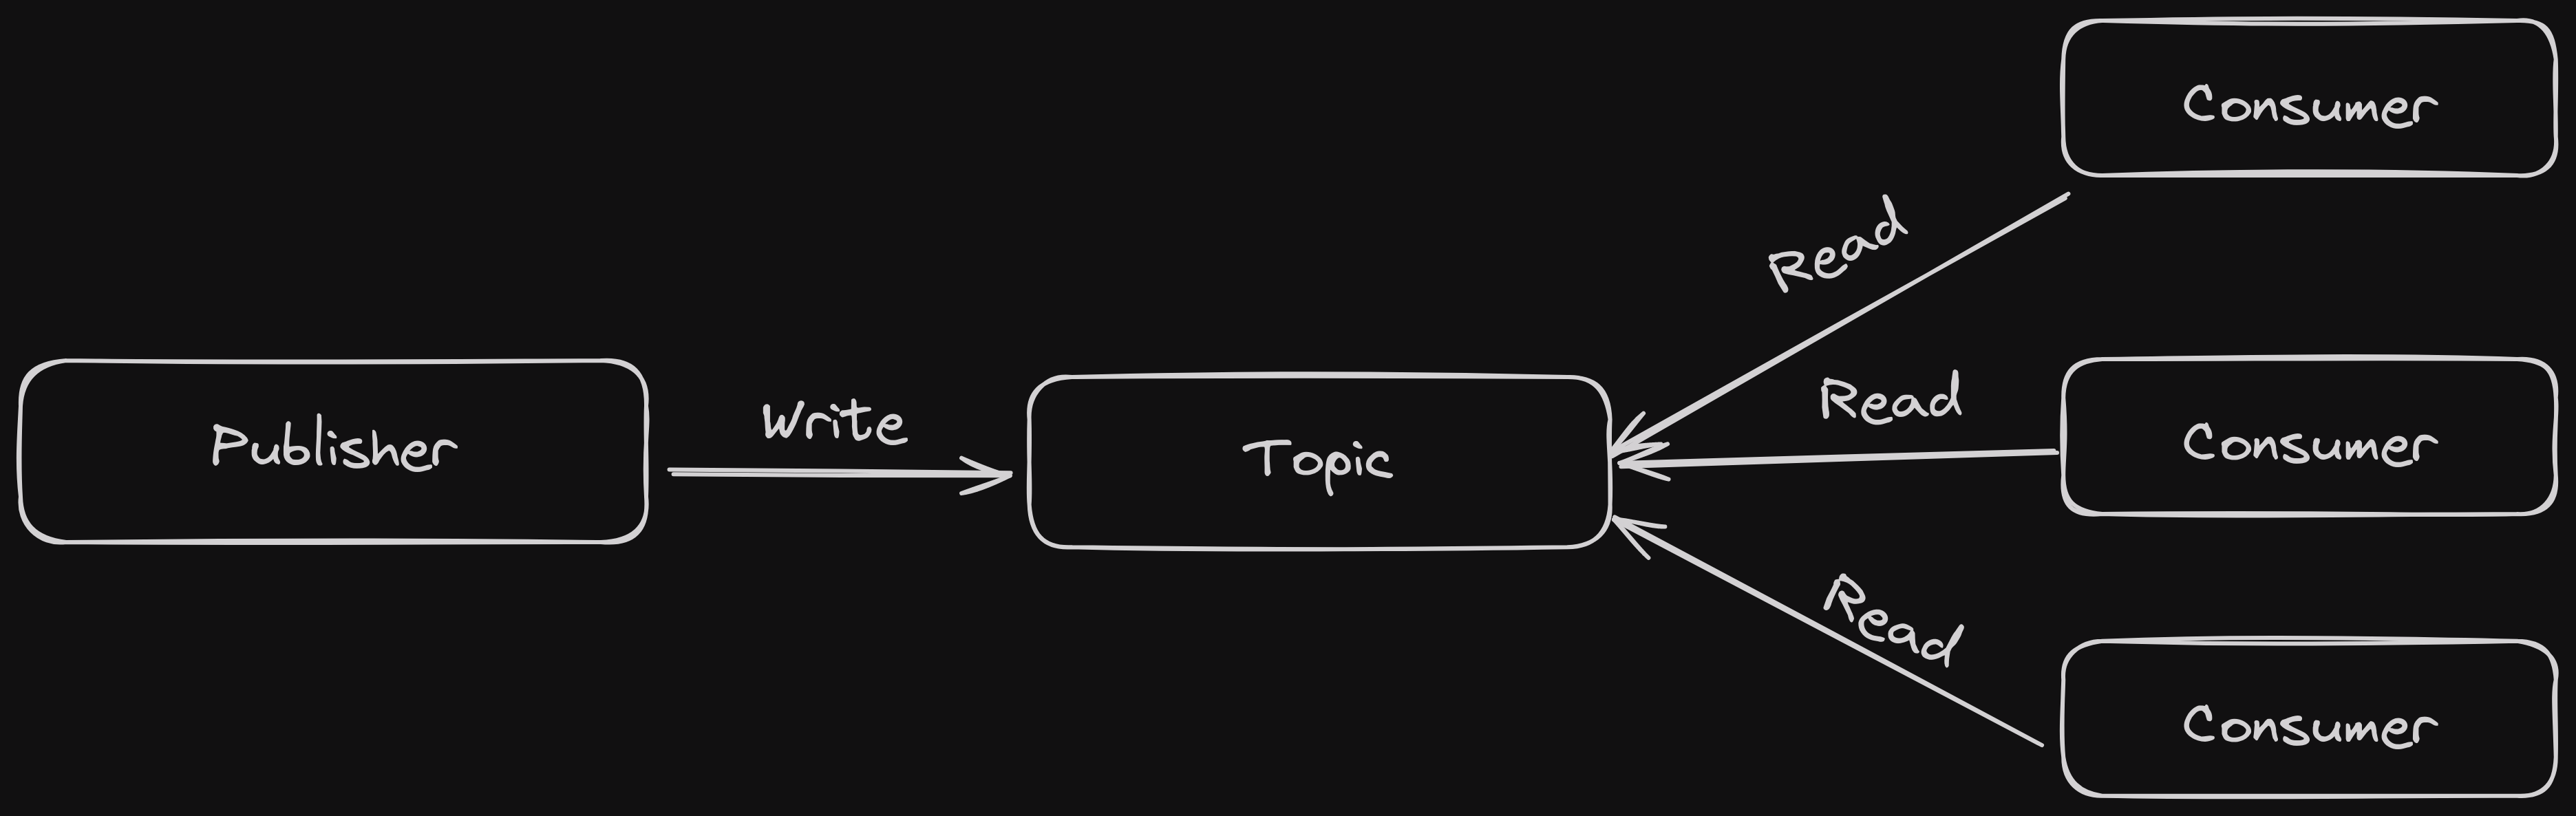
If you’re using Publish/subscribe messaging, you may have one message consumed by multiple clients, or if using the right terms, subscribers. With this method, your producer publishes a message to a topic, where one or more subscribers might be waiting for it. This resembles one-to-many relationship, while one producer has many subscribers.
Message brokers vs REST APIs
Since you’re already working with back-end software, you’re most likely familiar with REST APIs. Main question that you might be having, would be, why can’t we use REST services instead of message brokers? Well, it turns out that you can and nobody is stopping you, but there are some caveats. You see, the reason for using message brokers is not just we want to. They bring a lot of good as well, and in terms of comparison with REST APIs, main advantage would be fault tolerance.
Sending a message to microservice with REST API
Let’s discuss a situation where you want to send some message to another microservice and you decide to use REST APIs. It might be working pretty good, but in this case you lack the same fault tolerance I told you about earlier. Your service might be running beautifully, have no bugs at all, but there’s still a possibility that something goes wrong and your message will never reach destination. Later on you might be performing some checks on did the message reach the destination or if it’s saved somewhere so that you could resend it to required service.
Sending a message using message brokers
On the other hand, if you went with message brokers, you’re way safer. Even if your app goes down, or anything else happens so that the service is unreachable, you can still be sure that once you spin up your project again, the message will be delivered right away. It doesn’t even matter if you’re using one-to-one or one-to-many relationship for your publisher and subscribers. Once your message got published and is added to a topic, you can be sure that whenever you require it, it will be available there. So it’s a big win for message brokers.
Summing up advantages of using message brokers
- Guaranteed message delivery - Even if your consumer/subscriber was offline, it will receive the message when it’ll be back online.
- Increased system performance - Since message brokers work asynchronously, main thread of the application will not be affected.
- Communicating between applications - You can integrate communication between all applications even if they are written using different programming languages or frameworks.
Drawbacks of using message brokers
- Adaptation process - There are multiple message brokers and different approaches of using them. You should be able to choose them wisely depending on your needs.
- Debugging difficulty - Since we’re adding new components to our architecture, debugging also becomes more difficult.
Most popular message brokers
- Apache Kafka - Developed by Apache Software Foundation with initial release in 2011. Written in Java.
- RabbitMQ - Initially developed by “Rabbit Technologies Ltd.” in 2007, currently under Pivotal Software . Written in Erlang.
Installing RabbitMQ
First thing you’d want to do is of course install RabbitMQ. Easiest way to do this is by running a docker container with it, as stated in RabbitMQ docs you can do it with a following command
docker run -it --rm --name rabbitmq -p 5672:5672 -p 15672:15672 rabbitmq:3.13-management
Now let me just clarify what this command does:
- -it - Runs a container in an interactive mode, in this case it will just be used to let you see the running logs which might help if you run into any problem.
- –rm - This flag tells docker to remove the container once you exit it, generally used for testing purposes or short-lived services.
- –name - Name of the container running.
- -p - Maps the container port to our machine port, in this case port
5672is used for AMQP (Advanced Message Queuing Protocol) and15672for RabbitMQ’s management UI. - rabbitmq:3.13-management - Image that we’re going to be using,
managementkeyword indicates that we also will be running management web-based UI.
After creating this docker container, you’d want your terminal window to be open, so that container will not exit and remove itself.
If you want to run RabbitMQ as a background container and decide later when to exit and delete it, you could remove a few flags and run it as follows
docker run -d --name rabbitmq -p 5672:5672 -p 15672:15672 rabbitmq:3.13-management
-d flag indicates detach, run in background.
After you’re done with it, you can verify that your container is actually running via following command
docker ps
You should see your RabbitMQ container running, which means we’re good to go.
Creating the publisher application
As you already know, message brokers require at least two applications to have them work properly, one of which will be a producer (publisher) and the second one would be a client (consumer).
Let’s start by creating our publisher application, we can easily do this via dotnet CLI.
dotnet new console --name Publisher

// For the better understanding, let's change the name of the main file
// If you're running Linux
mv Publisher/Program.cs Publisher/Publisher.cs

// If you're running Windows, you can use Powershell
Move-Item -Path "Publisher/Program.cs" -Destination "Publisher/Publisher.cs"
After creating our project, we need to add the RabbitMQ.Client NuGet package to our project.
cd Publisher
dotnet add package RabbitMQ.Client
Once the package is installed, we’re ready to start actually making our publisher.
First of all, let’s build ourselves a connection to RabbitMQ instance we’re running in a container.
using System.Text;
using RabbitMQ.Client;

var factory = new ConnectionFactory { HostName = "localhost" };
using var connection = factory.CreateConnection();
using var channel = connection.CreateModel();
At this moment, we’re already connecting to our instance, but let’s have a brief explanation of what actually is happening here.
First of all, ConnectionFactory abstracts a lot of things for us, such as authentication and so on, but the key part which you’ll be using for interacting with RabbitMQ is a channel, this is where all the API resides.
RabbitMQ uses queues for messages, think of it as a post box, so at first, we must create a queue where we’re going to send our messages.
channel.QueueDeclare(queue: "hello-world",
                     durable: false,
                     exclusive: false,
                     autoDelete: false,
                     arguments: null);
Let’s dive into what’s going on.
durable: RabbitMQ queues can be or not be durable. Which means, it will survive broker restart.exclusive: This parameter controls whether the queue should be exclusive. If set totrue, queue will be deleted once the connection is dropped.autoDelete: If you want your queue to automatically delete itself once last consumer unsubscribes, you can set this parameter totrue.arguments: Optional arguments, you can see some of them in the docs .
Creating a queue in RabbitMQ is an idempotent action, so a queue will only be created if it doesn’t exist, otherwise, it’ll just ignore it without any error.
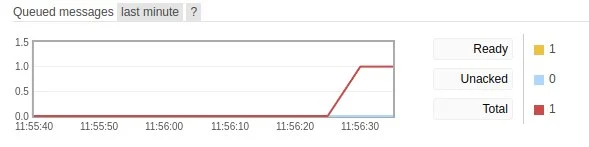
If you run your code right now and navigate to http://localhost:15672, you’ll be able that your queue has already been created, but there are no messages or consumers, but it’s fine.
For logging in to RabbitMQ’s web UI, you’ll need to use guest:guest username and password. Now, we can continue and actually add a message to our queue.
const string message = "Hello!";
var body = Encoding.UTF8.GetBytes(message);

channel.BasicPublish(exchange: string.Empty,
                     routingKey: "hello-world",
                     basicProperties: null,
                     body: body
                    );
Console.WriteLine($"Message successfully sent, text - {message}");
Messages in RabbitMQ are transported as byte arrays, so we need to turn our string into one. One thing to notice here is the routingKey, publishers use it to describe the message’s destination and consumers use it to read only the messages that they need.
The routingKey specifies the destination queue for the message being published.
At this point, if you run your code, you’ll be able to see that a message has been successfully sent and you can verify it in the web UI. You could even read it there right away, but keep in mind that once the message has been read, it’s being deleted from the queue, so you might need to resend it to read from the actual consumer.
Keep in mind that, reading a message is a destructive action
Finally, you’ll be looking at the code snippet like this one, at this point, our publisher is ready.
using System.Text;
using RabbitMQ.Client;

var factory = new ConnectionFactory { HostName = "localhost" };
using var connection = factory.CreateConnection();
using var channel = connection.CreateModel();

channel.QueueDeclare(queue: "hello-world",
                     durable: false,
                     exclusive: false,
                     autoDelete: false,
                     arguments: null);

const string message = "Hello!";
var body = Encoding.UTF8.GetBytes(message);

channel.BasicPublish(exchange: string.Empty,
                     routingKey: "hello-world",
                     basicProperties: null,
                     body: body
                    );
Console.WriteLine($"Message successfully sent, text - {message}");
Creating the consumer application
Once you’re done with your publisher application, you’d want to read the messages sent by it as well, for this purposes, we’re going to use the consumer application, so let’s first create it. We’re going to be using the same commands we used to create the publisher application.
dotnet new console --name Consumer

// For the better understanding, let's change the name of the main file
// If you're running Linux
mv Consumer/Program.cs Consumer/Consumer.cs

// If you're running Windows, you can use Powershell
Move-Item -Path "Consumer/Program.cs" -Destination "Consumer/Consumer.cs"
Once again, we’re going to add the RabbitMQ.Client package as well.
cd Consumer
dotnet add package RabbitMQ.Client
After going through this, we’re ready to dive into creating our consumer application, basic setup is the same again.
using System.Text;
using RabbitMQ.Client;

var factory = new ConnectionFactory { HostName = "localhost" };
using var connection = factory.CreateConnection();
using var channel = connection.CreateModel();

channel.QueueDeclare(queue: "hello-world",
                     durable: false,
                     exclusive: false,
                     autoDelete: false,
                     arguments: null);

Console.WriteLine("Consumer waiting for messages...");
Note that queue name and other parameters should be matching with the one you used while declaring it in the producer project.
Once we have the basic setup done, we’ll need to start actually reading messages and RabbitMQ does this through event handlers.
var consumer = new EventingBasicConsumer(channel);
consumer.Received += (model, ea) =>
{
    var body = ea.Body.ToArray();
    var message = Encoding.UTF8.GetString(body);
    Console.WriteLine($"Received a message - {message}");
};

channel.BasicConsume(queue: "hello-world",
                     autoAck: true,
                     consumer: consumer);

Console.ReadLine();
Let’s have some deep dive into what’s going on in here and how it all works.
First, we’re creating an event based consumer attached to our channel, which later on is using the Received event to track new messages. As I’ve already mentioned, messages are just byte arrays for RabbitMQ, so we need to decode it back into string. Later on, we just notify RabbitMQ that the message has been successfully consumed by our consumer instance and it’s safe to delete it.
Testing interaction between our applications
If you run the Publisher application right now and follow-up by running your Consumer application, your console output will look like something similar to this
cd Publisher
dotnet run

Output:
Message successfully sent, text - Hello!

cd Consumer
dotnet run

Output:
Consumer waiting for messages...
Received a message - Hello!
Conclusion
That would be it for today, Hope this article helped you better understand how to work with RabbitMQ and message brokers in general.
Thank you for taking the time to read :)
If you enjoyed the article, you’re welcome to join the Discord community, or Telegram channel.